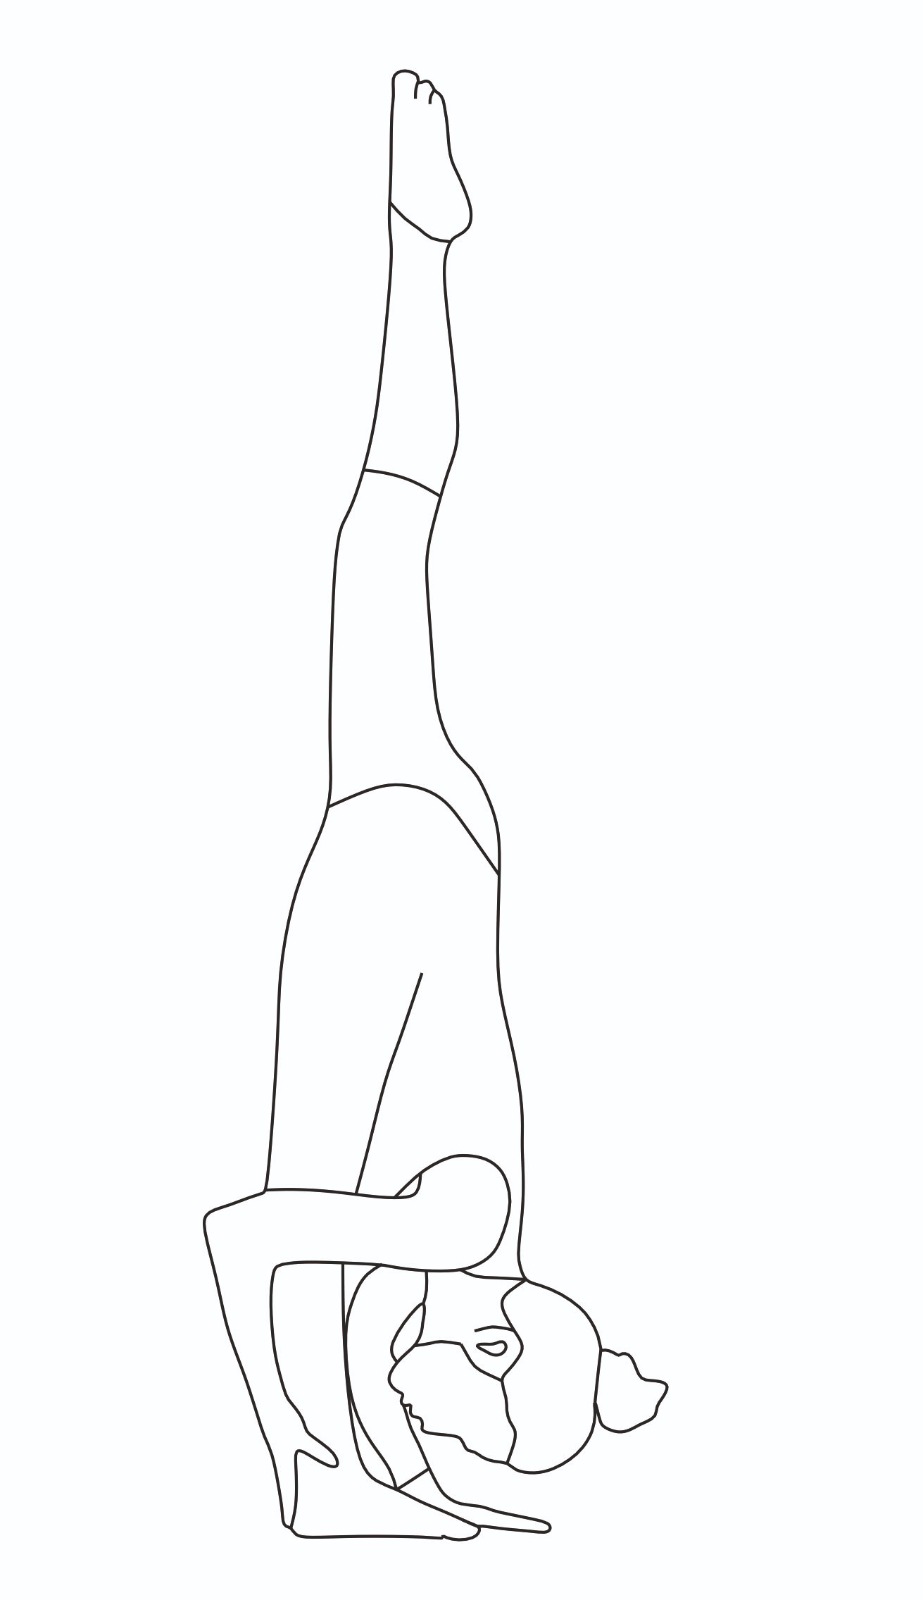
A Standing Split yoga pose is an amalgam of flexibility and strength that requires massive muscle engagement. In Sanskrit, it is known as Urdhva Prasarita Eka Padasana wherein “Urdhva” means “raised” or “elevated,” “prasarita” means “stretched out” or “extended,” “eka” means “one,” “pada” means “foot” or “leg”. The standing split is challenging, so be patient and consistent with your practice to improve your flexibility and balance over time.
Standing Split Pose Step-by-Step Instructions
The standing split is a challenging yoga pose that requires balance, flexibility, and strength. Here are step-by-step instructions to help you perform the vertical separation:
- Stand at the top of your mat with your feet together. Step your right foot back and turn it out to the side, aligning it with the arch of your left foot. Bend your left knee, keeping it directly over your left ankle, and extend your arms to the sides at shoulder height, palms facing down. This is Warrior II Pose.

Standing split Pose Yoga
- Inhale and cartwheel your left arm up and over your head, creating an excellent opening in the left ribs.
- Exhale and twist your torso to the right, pivoting on the ball of your left foot to lift the heel off the floor. Lean forward, laying your front torso onto your right thigh.
- Set your hands on the floor on either side of your right foot. Use yoga blocks if your hands don’t comfortably reach the bottom.
- Walk your hands slightly ahead of your right foot and shift your weight onto the right foot.
- Inhale and slowly straighten your right leg while lifting your left leg parallel to the floor. Pay attention to the balance of external and internal rotation in each leg. The left leg might rotate slightly externally, so work on rotating the left thigh internally to keep the front pelvis parallel to the floor. Focus on the alignment of the standing leg’s knee. Make sure to turn the thigh outwardly so the kneecap faces straight ahead.
- Feel how the downward energy of the standing leg creates an upward movement in the raised portion. Aim to direct equal energy into both legs rather than focusing solely on how high your raised leg goes. Your torso should descend as the lifted leg ascends. If you’re flexible, you can grasp the back of the standing-leg ankle with your hand for added balance.
- Stay in the standing split pose for 30 seconds to 1 minute, focusing on your breath and maintaining your balance.
- Lower the raised leg with an exhale, gently bringing it back down. Repeat the sequence on the other side, with your left leg forward in Warrior II Pose, to maintain balance and symmetry.
Variations and Modifications
Variations of the Standing Split Pose can help you modify the pose to accommodate your flexibility and balance levels. These variations are excellent for beginners or individuals still developing their balance and flexibility. They allow you to gradually progress towards the full expression of the standing split pose while ensuring safety and stability during your practice. Remember to breathe deeply and stay focused on maintaining proper alignment in each variation. Here are two variations
Variation 1: Standing Split with blocks
This variation involves using yoga blocks to support your hands while performing the standing split.
Begin by placing yoga blocks in front of your feet when you’re in the standing split position.
As you fold forward and lift your leg back and up, rest your hands on the yoga blocks for added stability and support.
The blocks can help you maintain balance and make the pose more accessible, especially if you can’t reach the floor comfortably.
Variation2: Standing Split with a chair
Using a chair can provide additional support as you work on lifting your leg straight back and up in the standing split.
You can start by placing a sturdy chair before you and ensuring it’s stable.
You can perform the initial steps of the standing split, as mentioned in the step-by-step instructions above, with your hands on the chair’s backrest or seat.
As you lift your leg back and up, you can use the chair for balance and to gauge how high you can comfortably lift your leg.
The chair provides a stable surface to hold onto, making it easier to work on balance and flexibility.
Contraindications and Cautions
Lower back pain
Ankle injury
Knee Injury
Blood pressure
Sciatica
Preparatory Poses
Standing Forward Bend (Uttanasana)
Big Toe Pose (Padangusthasana)
Wide-legged Forward Bend Pose (Prasarita Padottanasana)
Downward Facing Dog (Adho Mukha Svanasana)
Head to Knee Pose (Janu Sirsasana)
Seated Forward Bend (Paschimottanasana)
Reclining Big Toe Pose (Supta Padangustasana)
Follow-up Poses
Cobra Pose (Bhujangasana)
Standing forward fold
Wild thing
Cow Face Pose
Prone Tree Pose
Happy Baby
Beginner’s Tip for Standing Split Pose
For beginners working on the Standing Split Pose, it can be challenging to maintain balance and stability while lifting one leg high off the ground. Here’s a helpful beginner’s tip:
To support the lifted leg, press the raised foot against a wall or hook the front ankle over the top edge of a chair back.
For wall support, stand with your back to a wall, and as you lift your leg into the standing split, gently press the sole of your raised foot against the wall. This will provide additional stability and help you maintain balance.
Alternatively, you can position a sturdy chair in front of you and hook the front ankle of your raised leg over the top edge of the chair’s backrest. This allows you to hold onto the chair for balance and support.
Using a wall or a chair in this way can make the Standing Split Pose more accessible for beginners. It gives you a point of contact and stability, allowing you to work on your flexibility and gradually improve your balance over time. As you become more comfortable and flexible, you can gradually reduce your reliance on these props and work towards the traditional Standing Split Pose. Please remember to practice with patience and consistency to keep going in your yoga practice.
Benefits
Standing Split Pose helps to calm the brain.
It is a highly beneficial yoga pose to stimulate the liver and kidneys.
It gives adequate stretching to the hamstrings, calves, and thighs.
It strengthens the thighs, knees, and ankles.
It also gives suitable stretching to the back of the leg, the front thigh and the groin.


